¶ Introduction
The Outbound Management Screen is the interface used to manage and track the entire outbound process.
Navigation: Warehouse > Outbound > Outbound Management
Screenshot:
Outbound Process- Actions and Status in UI.
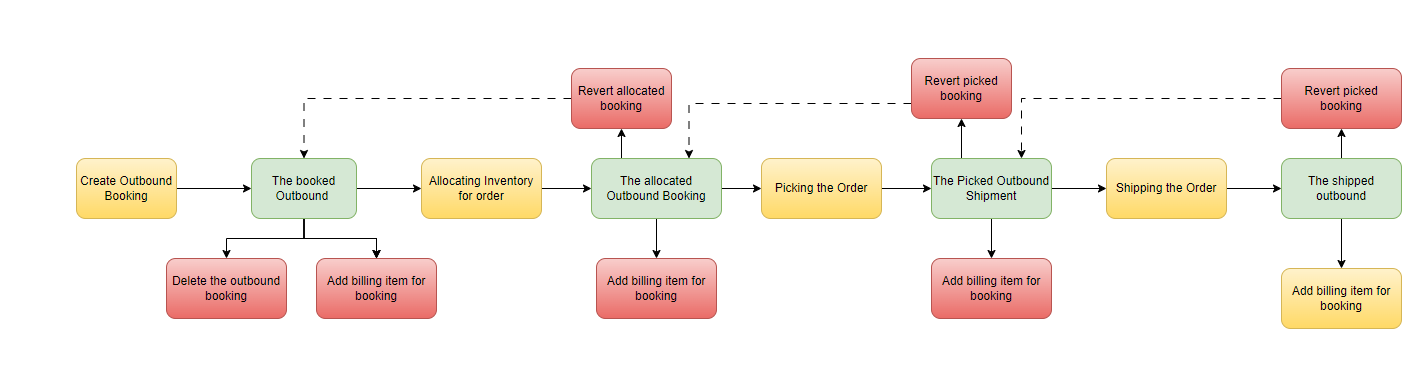
¶ Create an outbound order (Booked status)
¶ 1. Open Outbound management screen with status is Initial
There are 2 ways:
- Open screen from side-bar menu: Warehouse > Outbound > Outbound Management
- Click New button to open screen with status is Initial
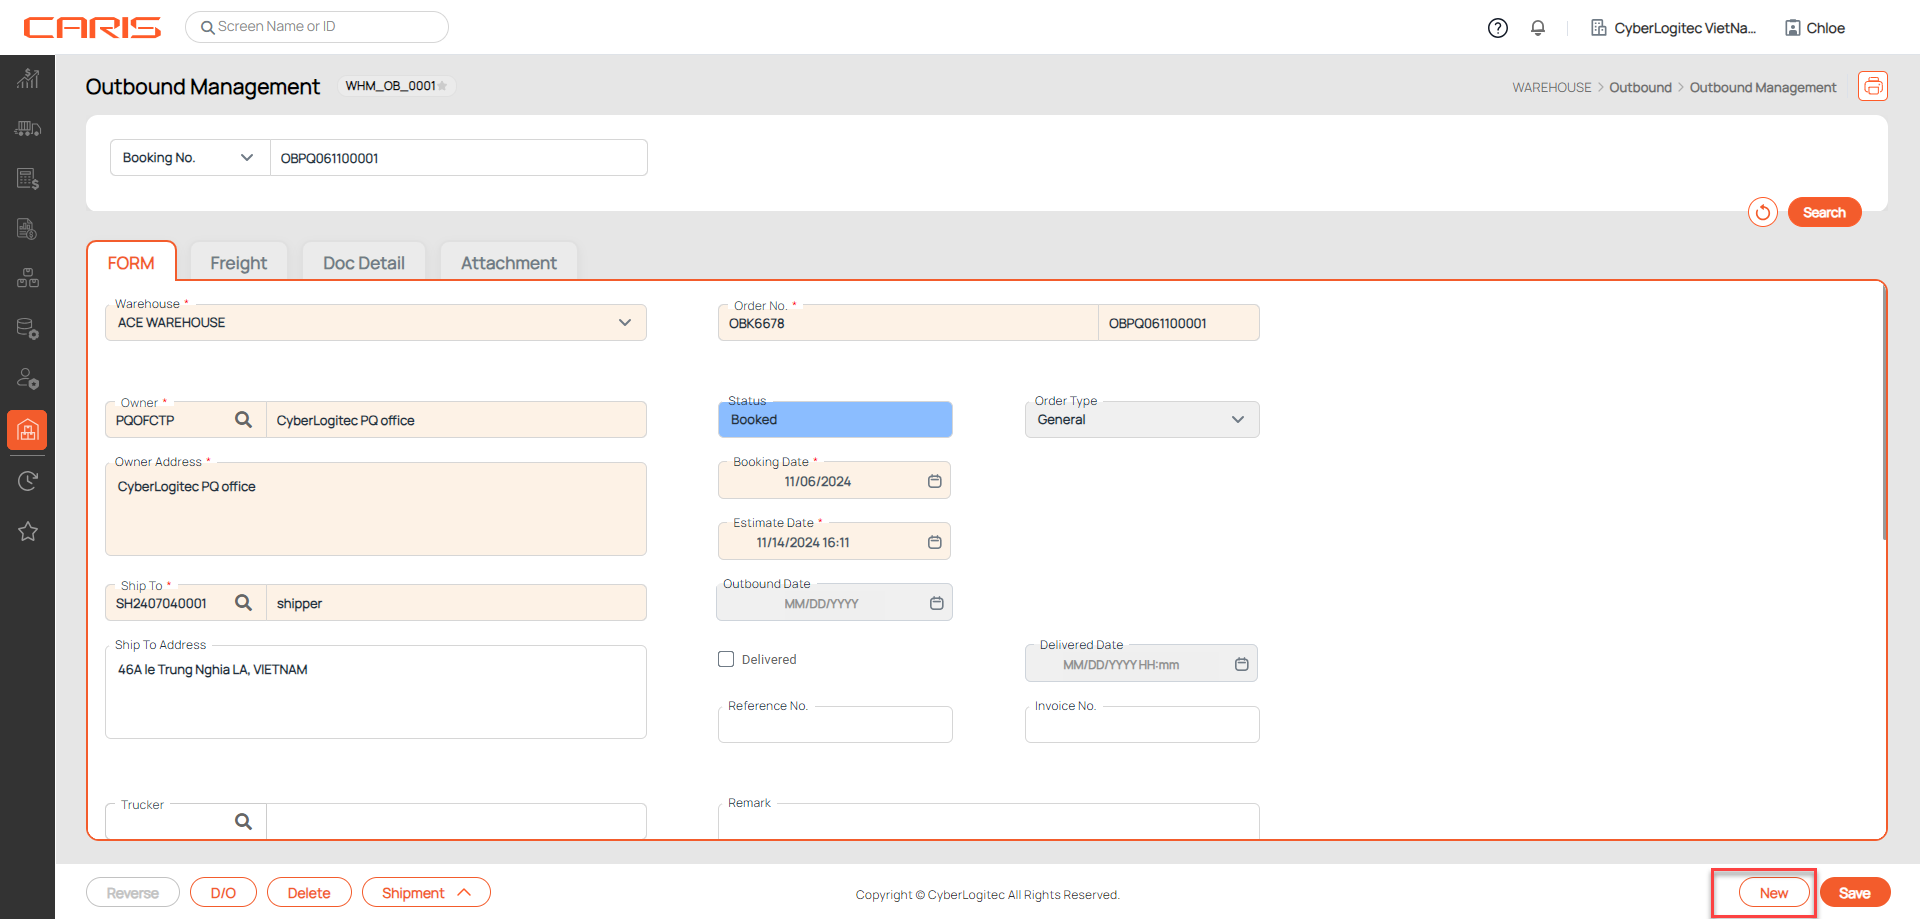
¶ 2. Enter information about a outbound booking
Note: Must be input required fields in FORM tab
- Enter Booking master information
- Click Stock Selection button and select item in popup
Description of fields in the FORM tab
+ Booking master information: The user manages the task of inputting master information for booking.
- Booking No. : the code of booking. The system will automatically generate them for each outbound booking.
- Order No. : the code of order
- Warehouse: the warehouse name
- Owner: the name and address of the company.
- Status: the state of current outbound booking. There are 4 kinds of status - Initial/ Booked / Allocated / Picked/ Shipped/ Cancelled
- Booking Date/ Estimate Date: the outbound booking creation date/ the estimated outbound date
- Outbound Date: actual date when the goods were shipped
- Ship To/ Ship to address: the place where items will be shipped to
- Order type:
- General: inbound stocks qty on the common purpose
- Return: handling outbound stocks (damages, no log salable, expired products ) to return to the retailers
- Adjustment: moving outbound stocks for bridging the gap, between the actual and the expected quantity of product
- Cross dock: products or orders that are brought into the warehouse but not put away
- Sales: moving outbound stocks for sale/marketing
- Gift: solving stocks for presenting purpose
- Sale Return: returning sale stocks to their acceptance places
- Marketing Return: returning marketing stocks to their acceptance places
+ Reference information: these are detailed data related to shipping document
- Trucker
- TR/CNTR: truck/ container number
- Seal No. : the number issued for a container after it was inspected and sealed. User can add the Seal No.
- D/O No. : delivery order number
- Vendor: the name and address of the true commodity supplier
- Invoice No. : invoice number of this booking
- Remark
+ Shipping information: the optional area for user to add the detail shipping data
- Master B/L, House B/L
- VSL/VOY: the code and name of a vehicle carrying consignments.
- Carrier: the carrier that handles shipping
- POL/ETD
- POD/ ETA
- DEL
+ Booking Item grid
- SKU (Stock keeping Unit )
- Contract No. : contract number of this item
- [UOM/ Qty/ Total ]: Qty is the quantity of items based on the unit of measure (UOM). Total is the quantity of items based on the handling unit in the contract.
- Stock Qty: the sum amount of stocks stored in the warehouse (both Put away and non-put away items)
- Item LOT: Item Lot is an identification code assigned to a particular type and quantity of items related to an assembly
- LOT4, LOT5: the additional lots used to store products just in case. (optional)
- Planned Transport: information truck/container of each item (for reference only)
- Serial No. : the number to identify individual pieces of items.
- LP No. (License Plate number): Unique identification labels for pallets
- PO NO. : indicating the purchase order stocks belong to.
¶ 3. Click Save button
- After saving successfully Booking Status will update to Booked
¶ Allocating Inventory to the Order (Allocated Status)
In WMS, allocation refers to the assignment of specific inventory to fulfill orders. This can be managed through either manual allocation or automation allocation.
¶ Manual Allocation
To allocate manually all the items in the list, follow below step:
1. Open outbound booking
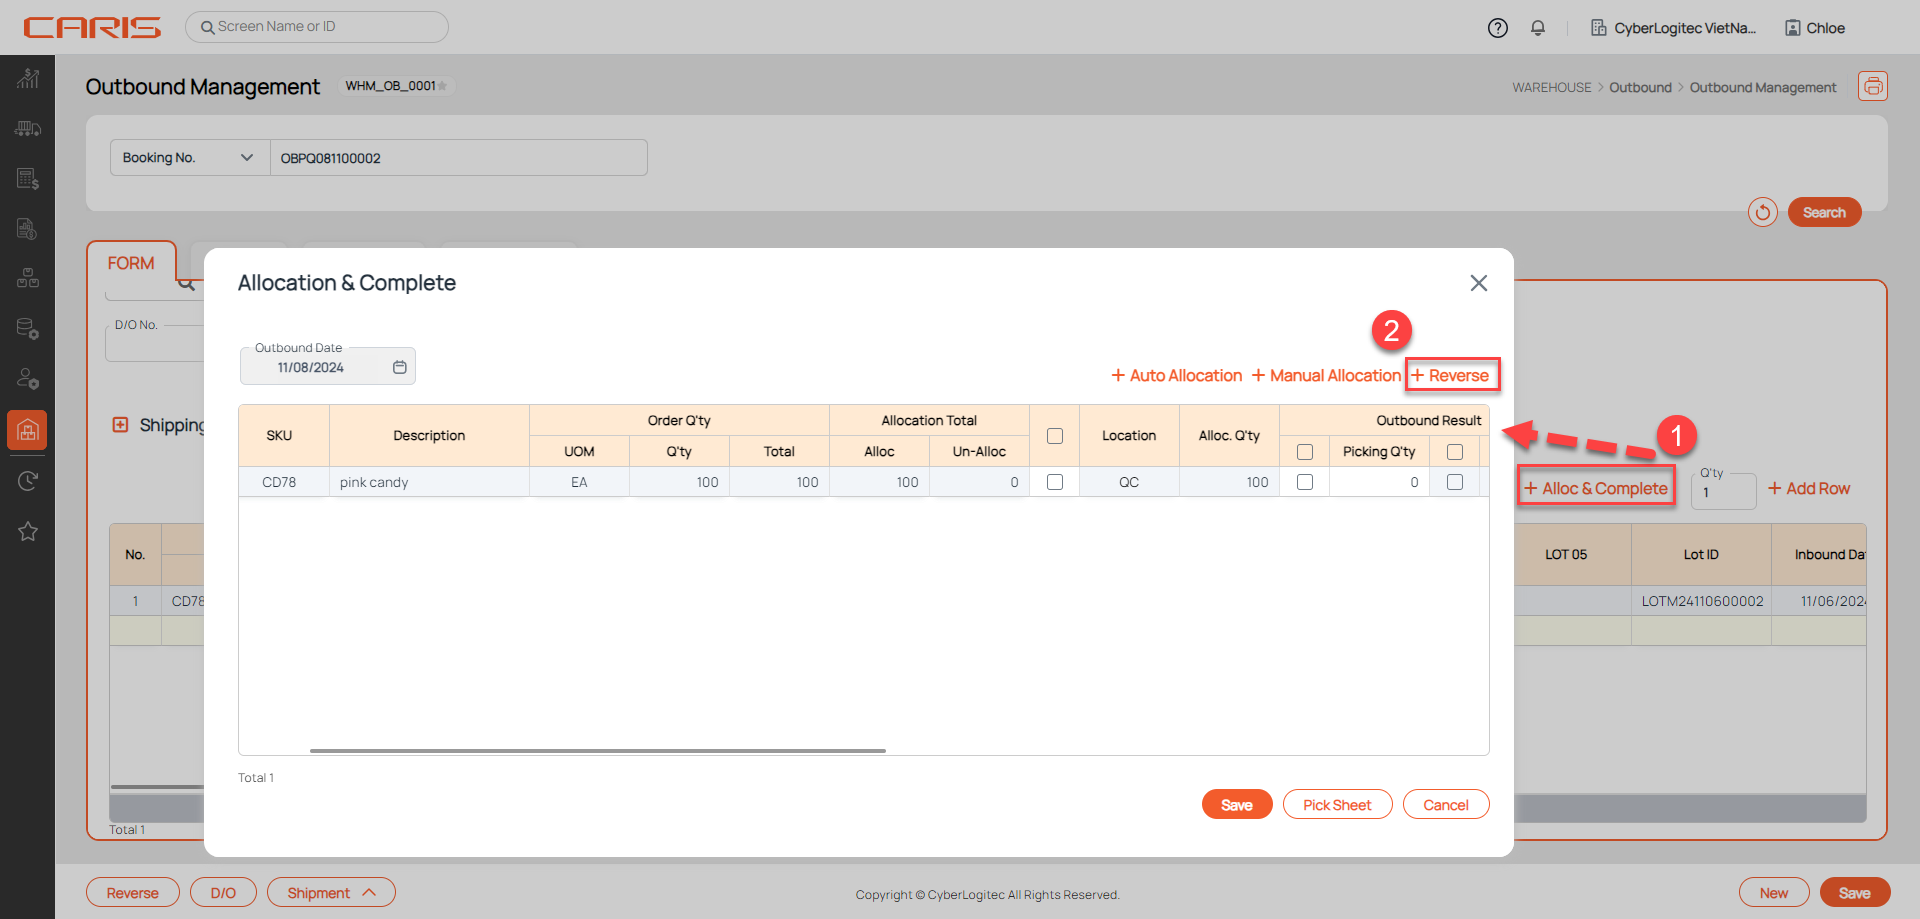
2. Click Alloc & Complete button to open Allocation & Complete popup
3. Click Manual Allocation button to open Manual Allocation popup
4. Enter allocation qty for each items at Alloc column
- Clicking the arrow button to see detailed information on the next (or previous) item.
5. Click Apply Alloc button to save data.
¶ Automation allocation
The automation allocation mechanism in a Warehouse Management System (WMS) enables the system to allocate stock to orders based on various criteria such as LOT number, Inbound Date, or Expiration Date. This ensures that inventory is allocated efficiently according to the specified mode. Here’s how the ascending (ASC) and descending (DES) modes work with each criterion:
ASC/DES Mode with LOT Number (LOT NO., LOT4, LOT5)
- Ascending (ASC) Mode: In ascending mode, the system allocates stock starting from the lowest LOT number, which is often used to prioritize older or smaller batches, facilitating an organized inventory turnover.
- Descending (DES) Mode: In descending mode, the system begins with the highest LOT number, which may be useful in cases where newer LOTs are preferred, or where items with a higher LOT number are more accessible or prioritized.
Ascending Mode with Inbound Date/Expiration Date
- Inbound Date: In ascending mode, the system allocates inventory starting with the earliest inbound date. This aligns with FIFO (First In, First Out) principles, ensuring that older stock is used before newer stock.
- Expiration Date: When expiration date is used as the criterion, the system allocates stock starting with the soonest expiration date. This follows the FEFO (First Expired, First Out) principle, ideal for perishable goods to minimize waste.
Descending Mode with Inbound Date/Expiration Date
- Inbound Date: In descending mode, the system starts with stock that has the latest inbound date and works backward. This can align with LIFO (Last In, First Out) principles, commonly used when newer stock needs to be prioritized or is easier to access.
- Expiration Date: When expiration date is used, the system allocates stock starting from the latest expiration date, which may be suitable for products with longer shelf lives or durable goods.
Steps to Run Auto-Allocate:
- Configure Auto-Allocation Rules at Shipping Strategy UI. NOTE: Auto-Allocation Rules is the strategy marked Default.
- Open the booked booking
- Click Alloc & Complete button to open Allocation & Complete popup
- Click the Auto Allocation button.
- Review Allocation Results in the grid
- Once the auto-allocation process is completed, review the allocation summary. This summary typically shows: Which inventory items have been reserved for each order. Locations from which inventory will be picked. Any exceptions or issues, such as items that couldn’t be allocated due to insufficient stock.
Status: Allocated
- Once items are allocated, the order status updates to Allocated. This confirms that specific inventory has been reserved for the order, ready for the picking process.
¶ Picking the Order (Picked Status)
After allocation, the next step is to physically retrieve items from their storage locations in the warehouse.
Transition to Picked, once warehouse staff have collected the items from the assigned locations, the order status updates from Allocated to Picked. This stage confirms that the items are ready for packing and shipment.
Here’s how to do it:
- Open the allocated booking
- Click Alloc & Complete button to open Allocation & Complete popup
- Enter allocation qty for items at Picking Q'ty column
- Click Save button
- After saving successfully, the outbound booking status is updated to Picked.
Status: Picked
- This status indicates that the items are now ready for packing or shipping.
¶ Shipping the Order (Shipped Status)
After items are picked, they are prepared for dispatch, usually involving packing, labeling, and staging for transportation.
Transition to Shipped when the items leave the warehouse, the status updates from Picked to Shipped, indicating that the order has been dispatched and is on its way to the destination.
Here’s how to do it:
- Open the picked booking
- Click Alloc & Complete button to open Allocation & Complete popup
- Enter allocation qty for items at Shipping column
- Click Save button
- After saving successfully, the outbound booking status is updated to Shipped.
Status: Shipped
- This status indicates the order has left the warehouse and completes the outbound process.
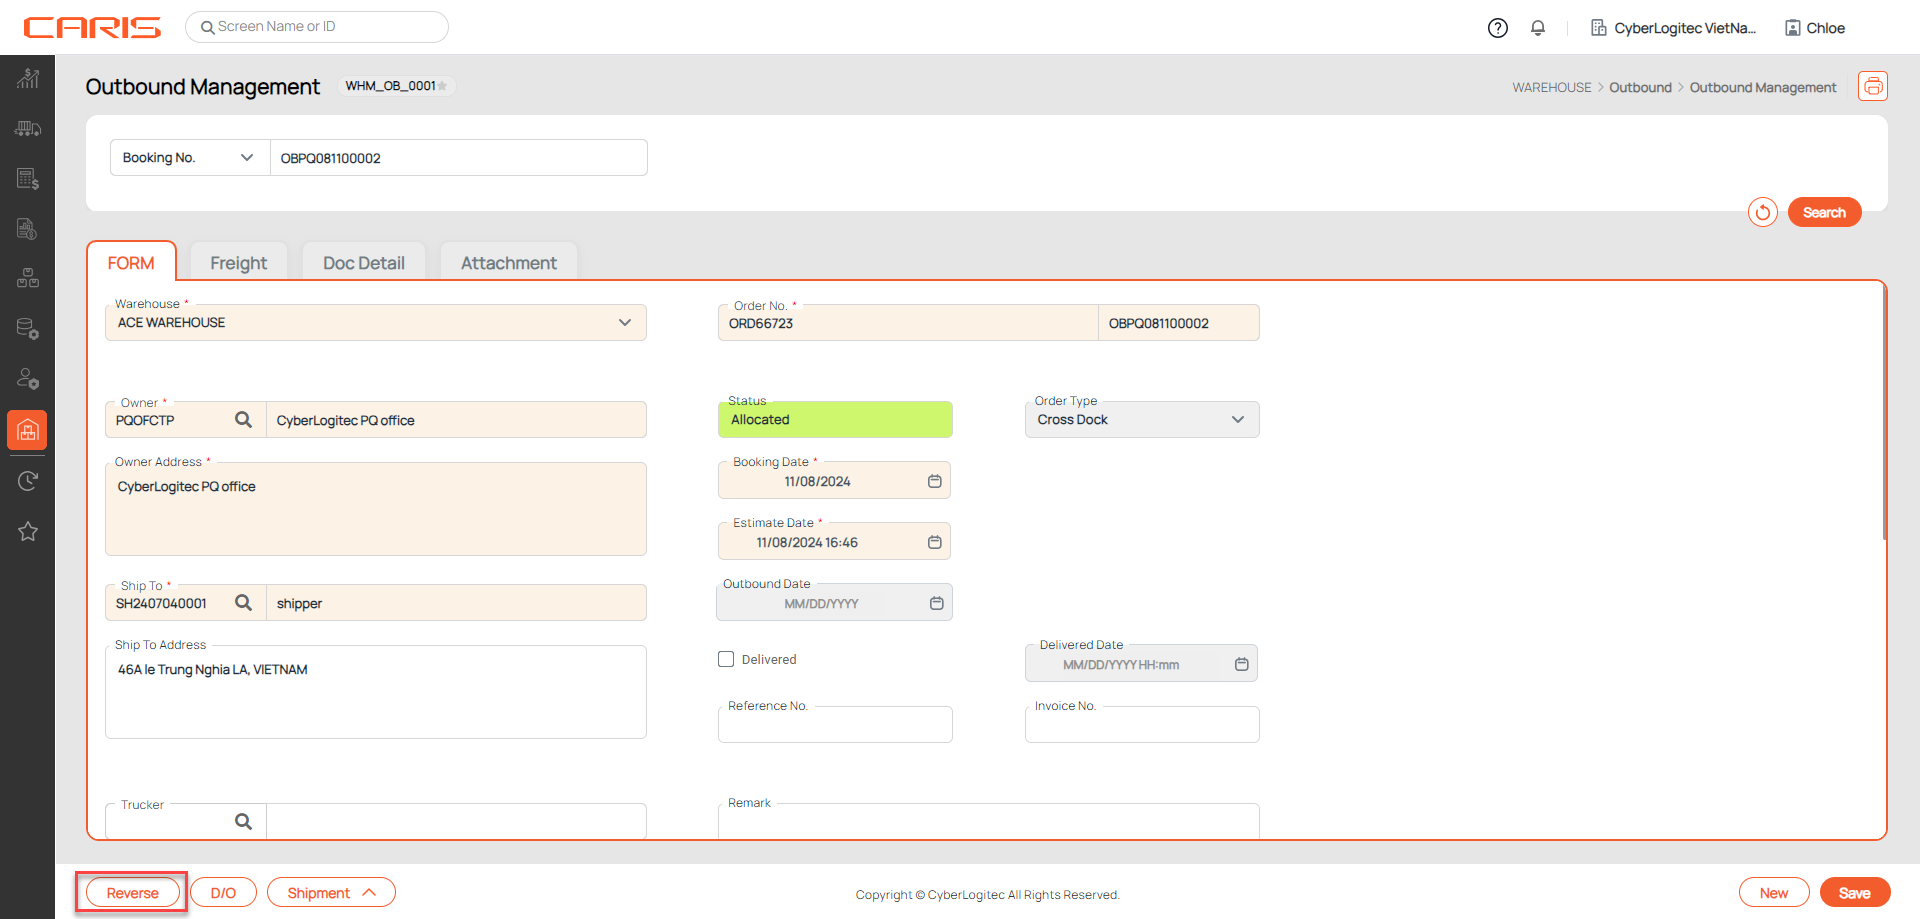
¶ Revert booking status
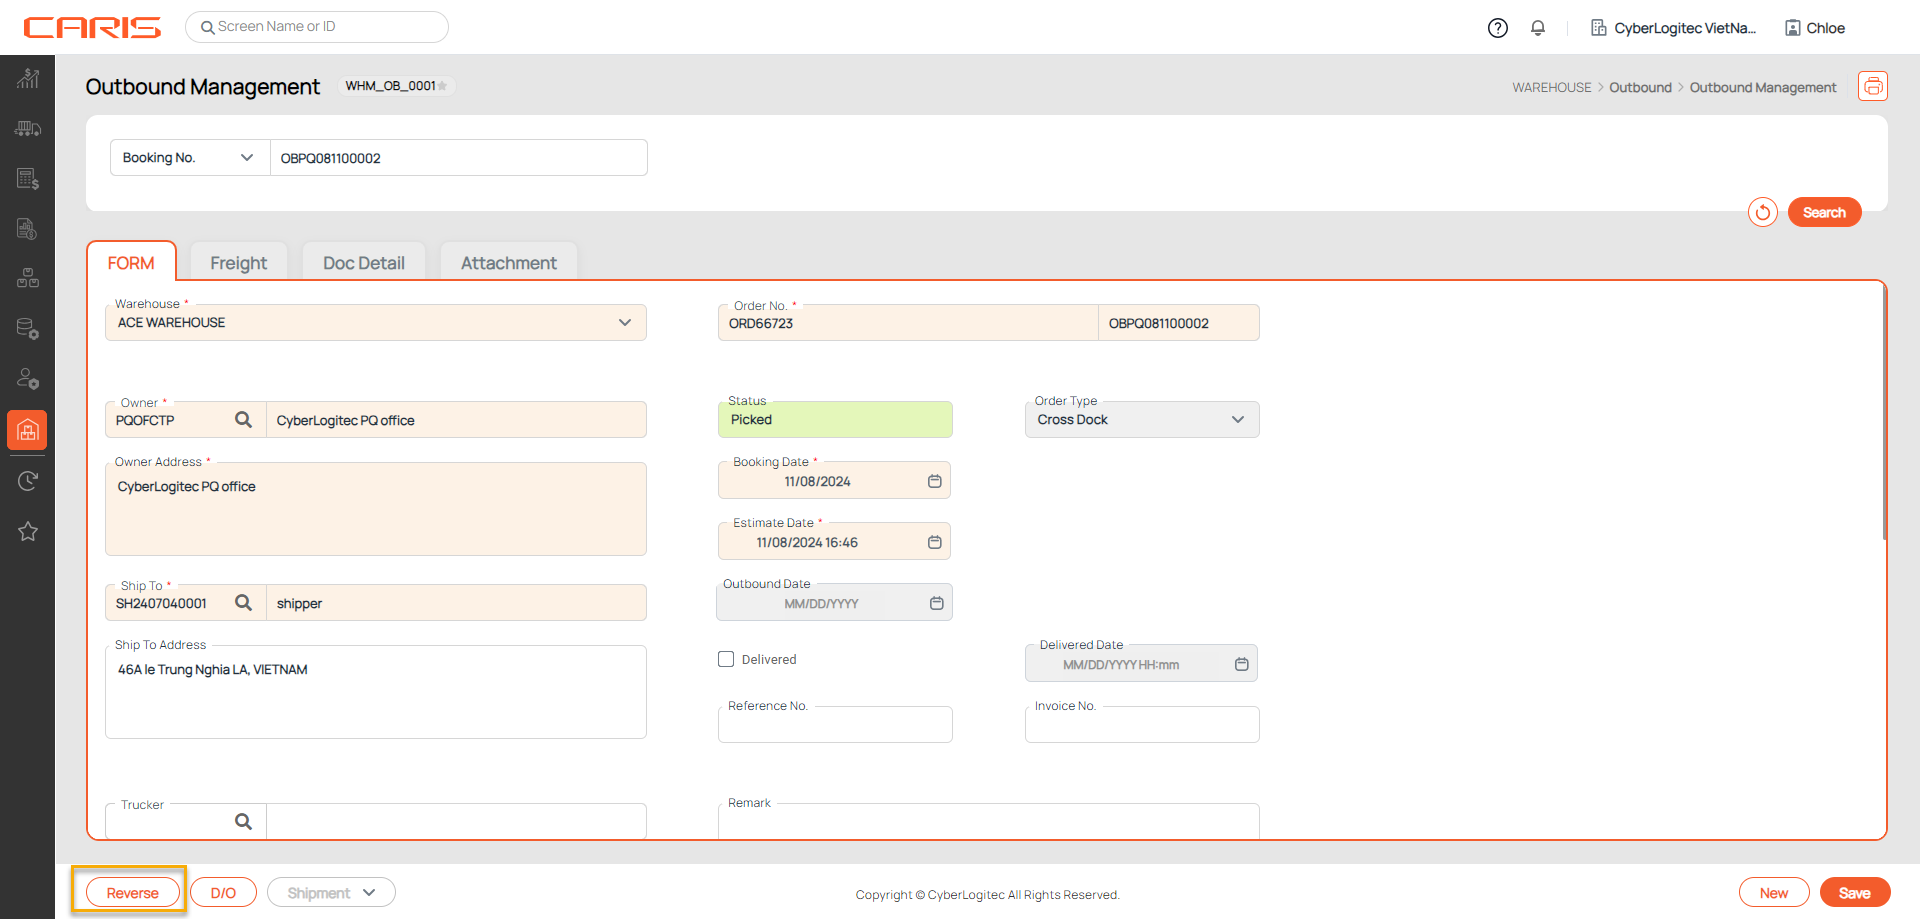
¶ 1. Revert an allocated booking
The goal is to remove the inventory allocation, returning the booking to a previous status (Booked) without any reserved stock.
There are two ways how to do it:
- Open an allocated booking and click Revert button at Outbound Management UI
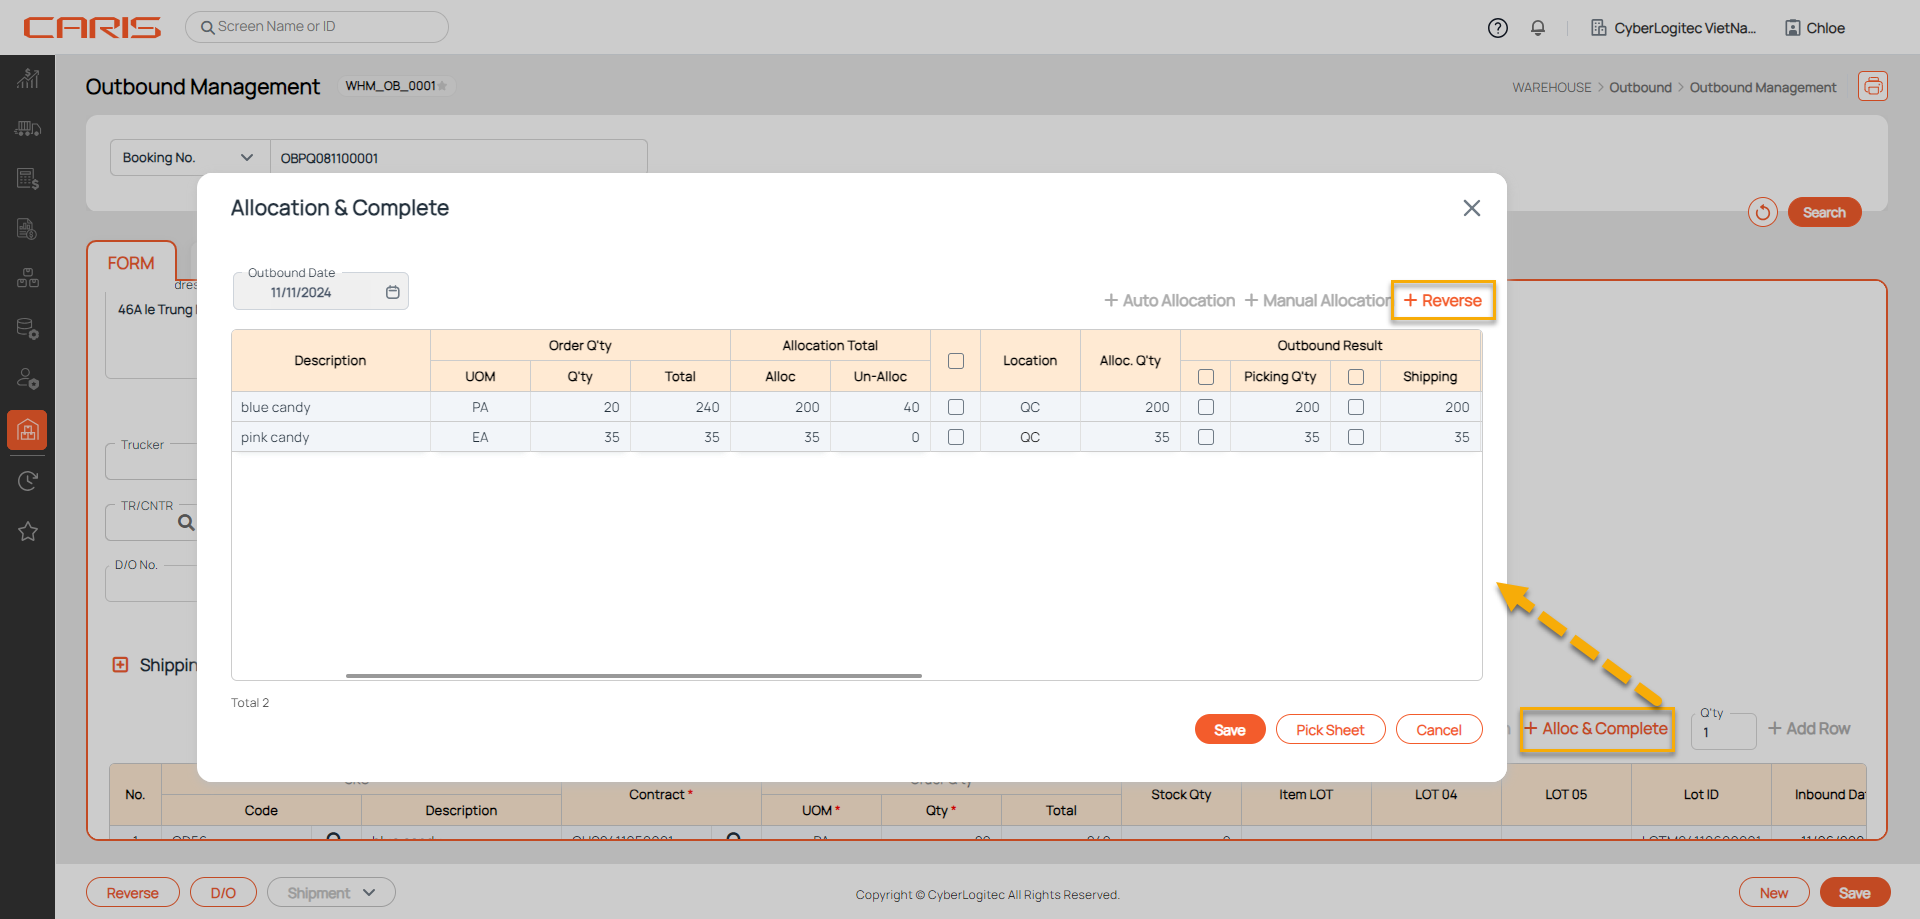
2. Open an allocated booking and click Revert button at Allocation & Complete popup
¶ 2. Revert a picked booking
To returning the booking to a previous status (Booked, Allocated)
Steps to Revert to Allocated Status:
- Open the picked booking
- Click Alloc & Complete button to open Allocation & Complete popup
- Click Revert button at popup
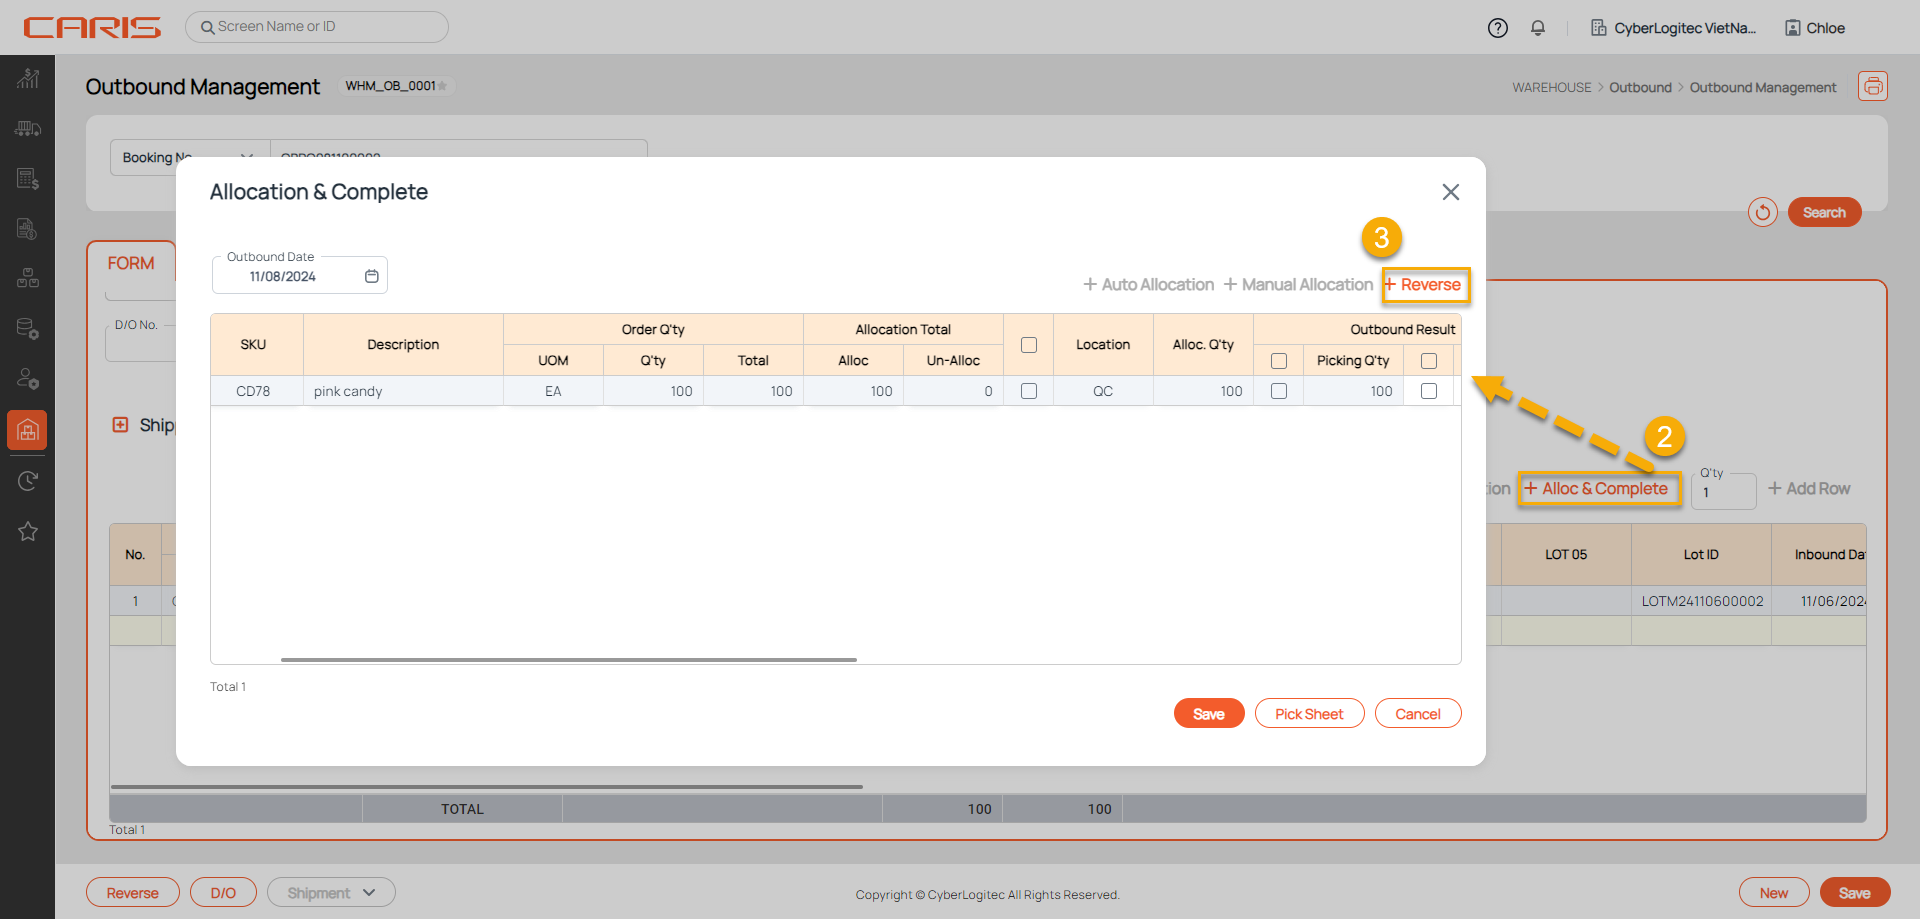
To Revert to Booked Status: Open a picked booking and click Revert button at Outbound Management UI
¶ 3. Revert a shipped booking
To returning the booking to a previous status (picked)
- Open the shipped booking
- Click Alloc & Complete button to open Allocation & Complete popup
- Click Revert button at popup
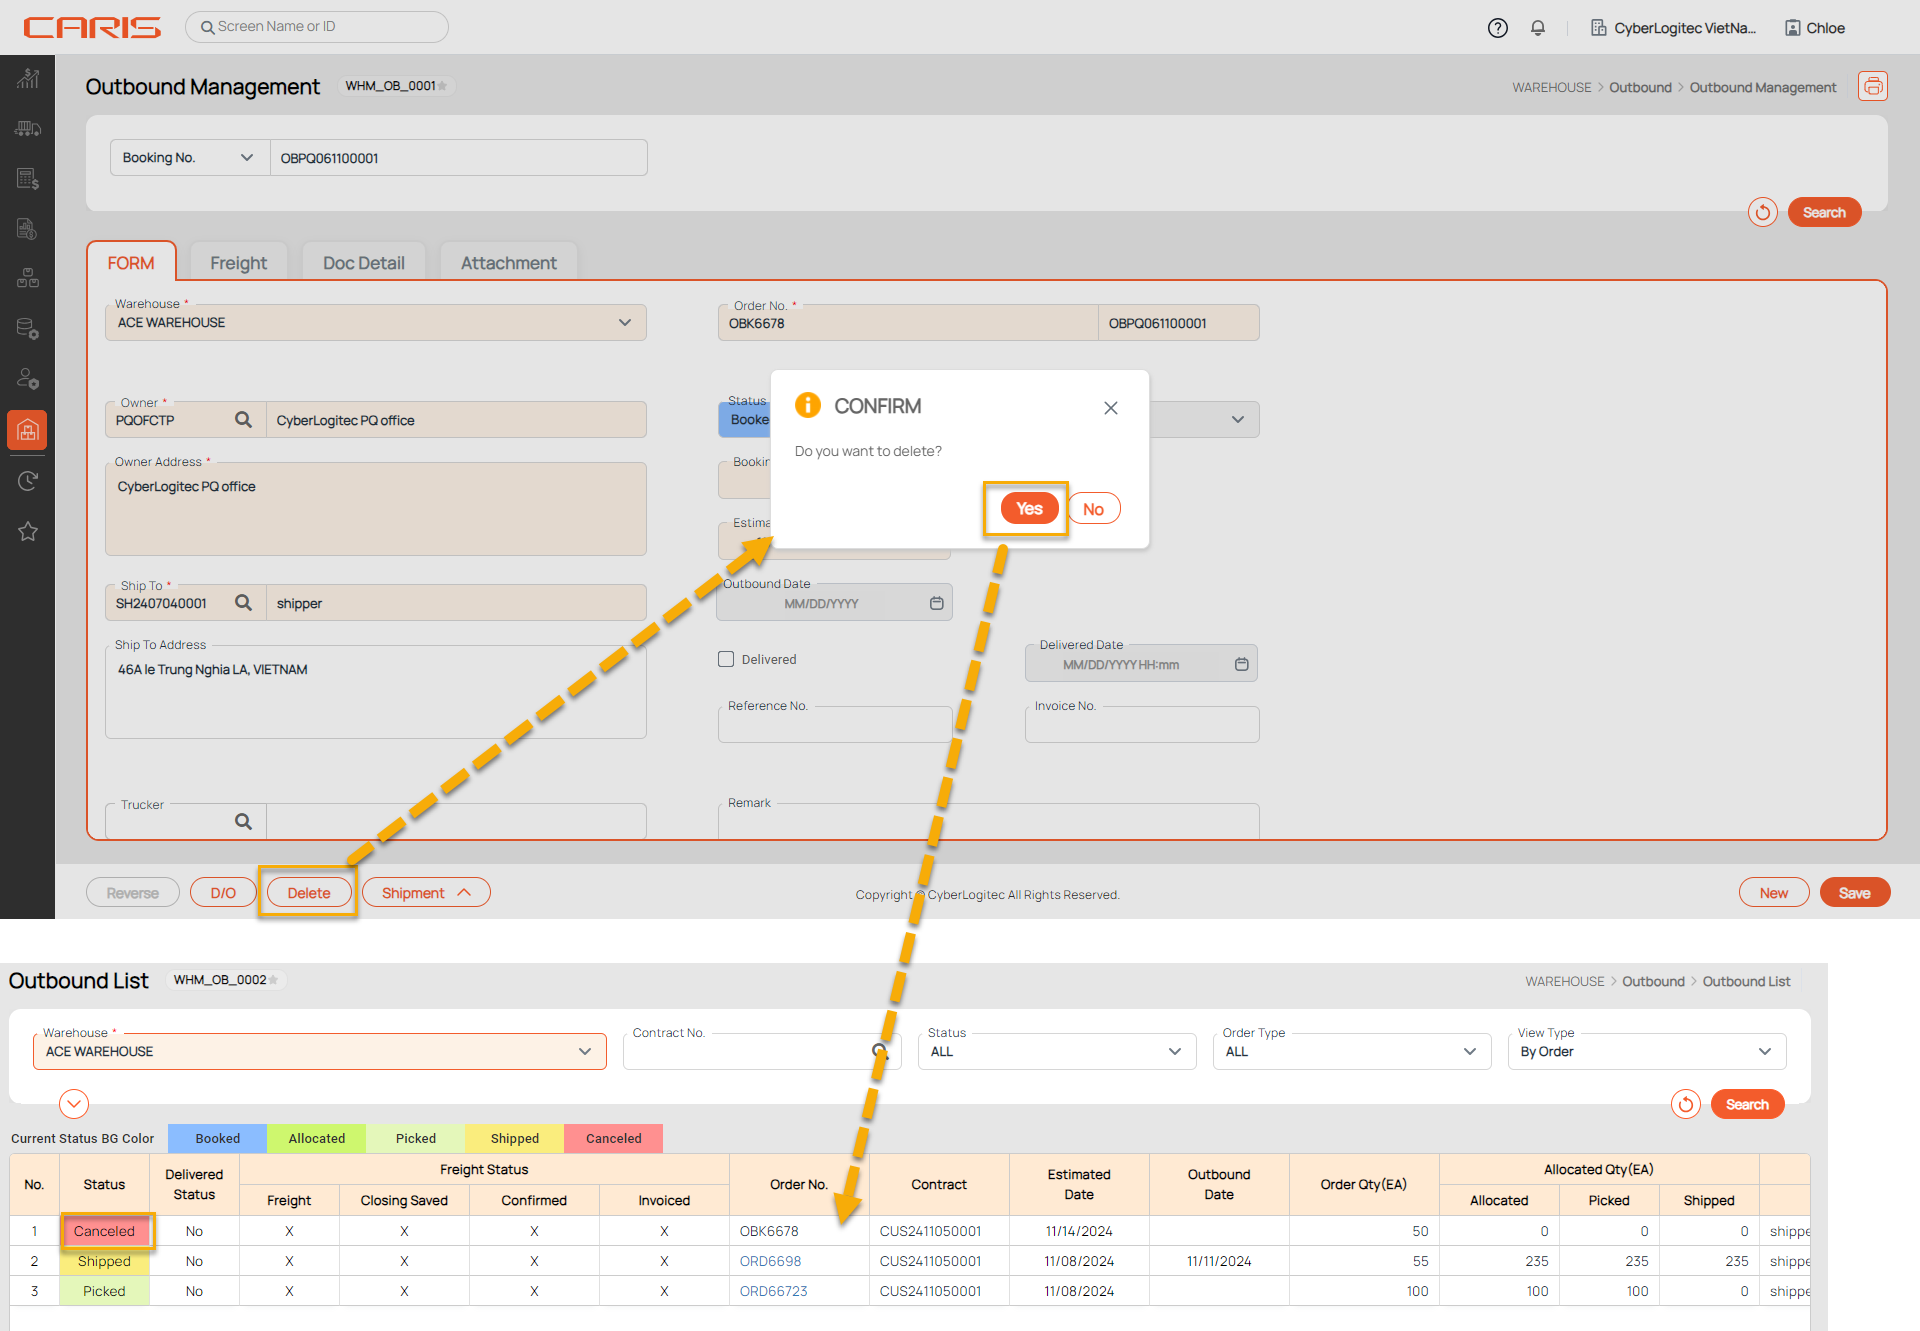
¶ Delete the outbound booking
1. Open the outbound booking that has status Booked
2. Click the Delete button.
- After deleting successfully, status updates to Cancel
¶ Print reports
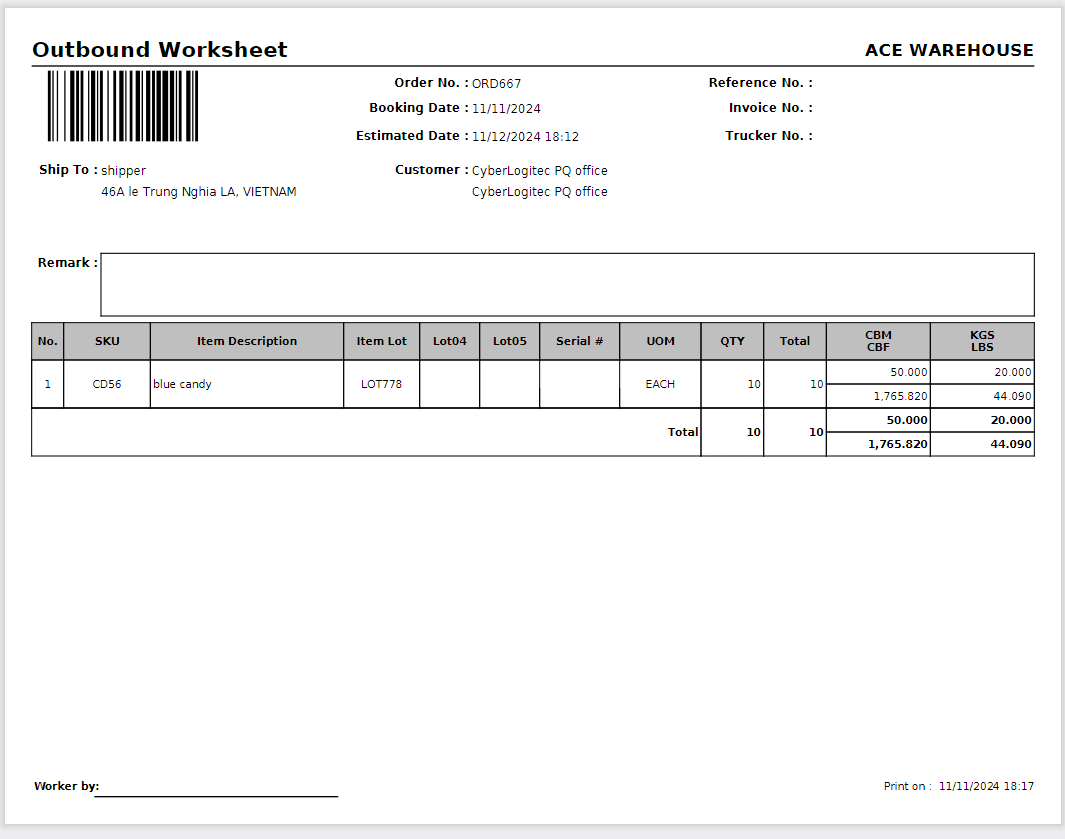
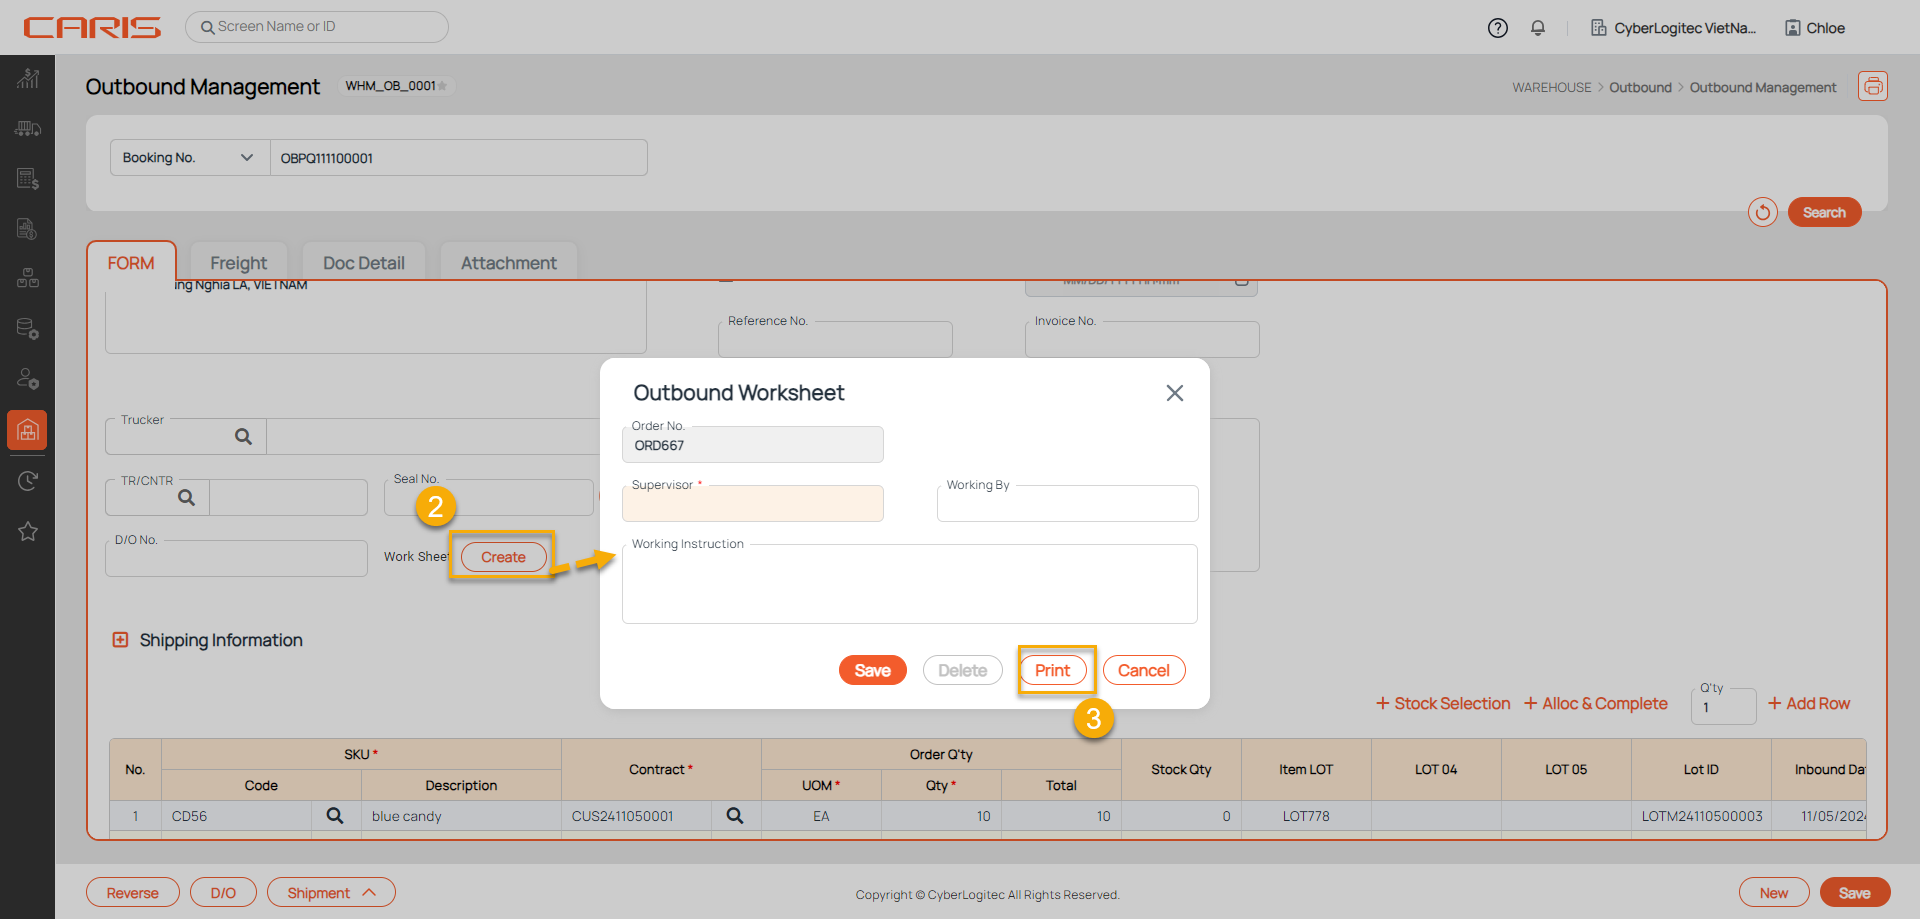
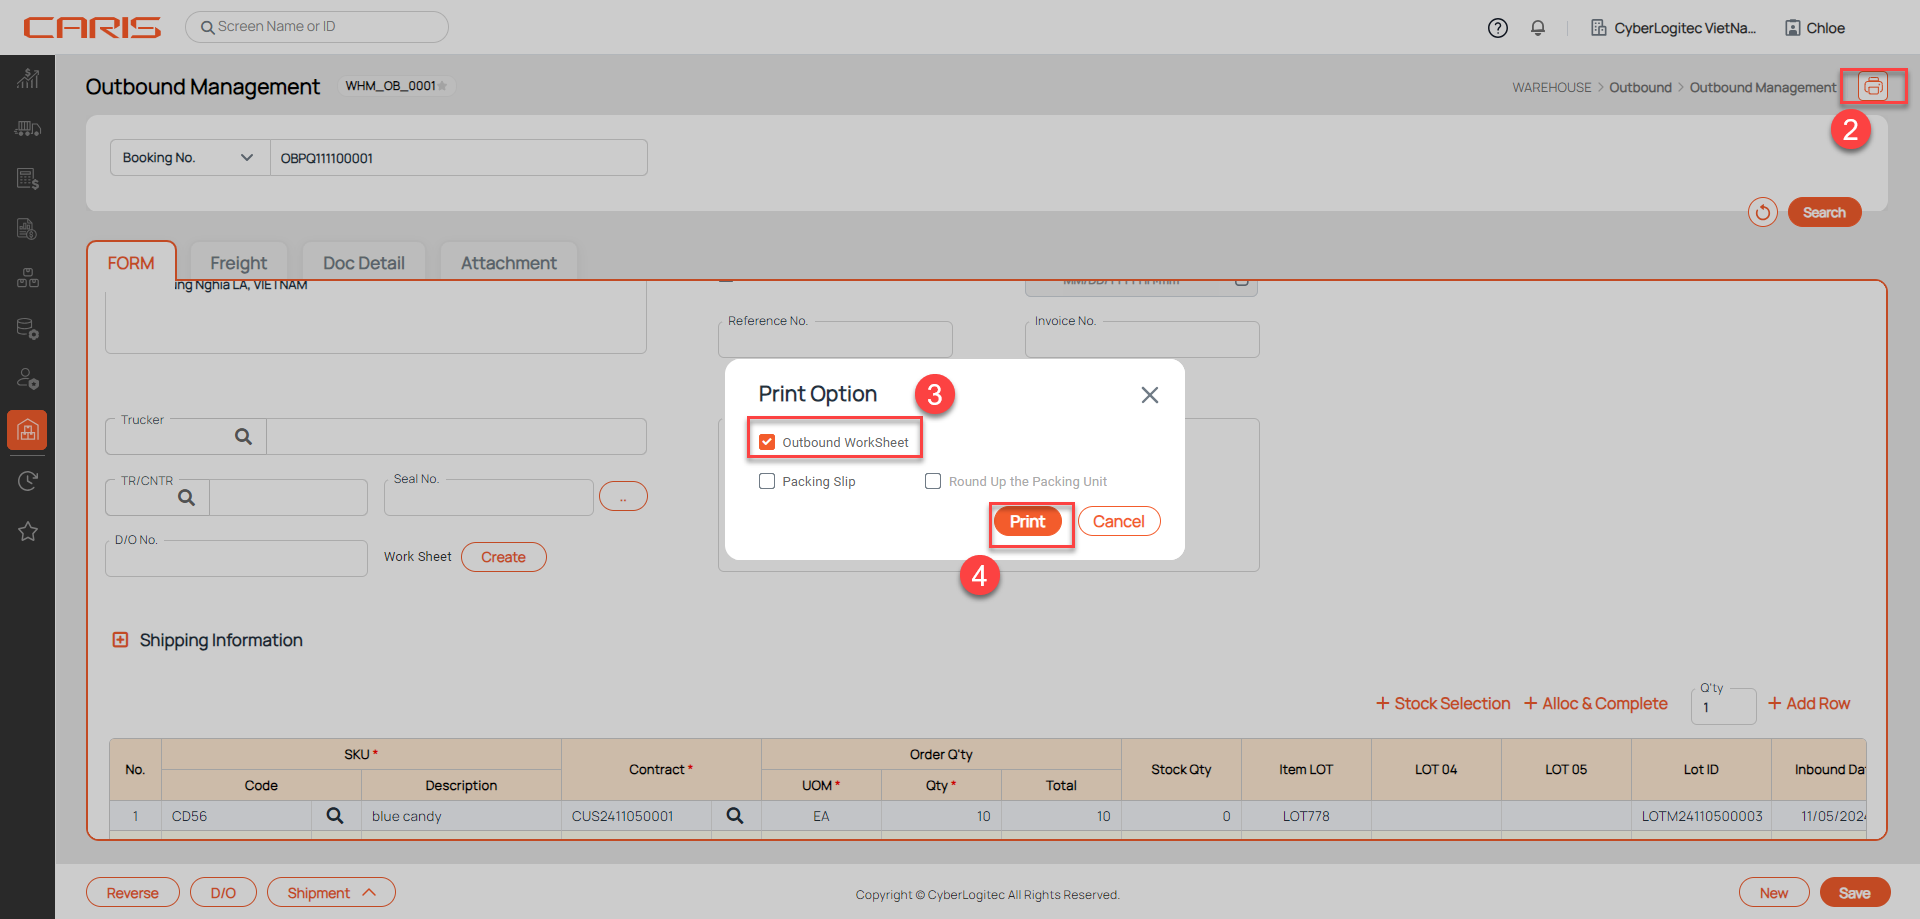
¶ 1. Outbound Worksheet report
The Outbound Worksheet Report in a Warehouse Management System (WMS) is a document designed to assist warehouse personnel in efficiently managing outbound orders, specifically during the picking and packing stages.
There are 2 ways to print a report:
- First:
- Open outbound booking
- Click the Create(Edit ) Worksheet button to open the Outbound Worksheet popup
- Click Print button
- Seconds:
- Open outbound booking
- Click the print icon
- Select print option is Outbound Worksheet
- Click Print button
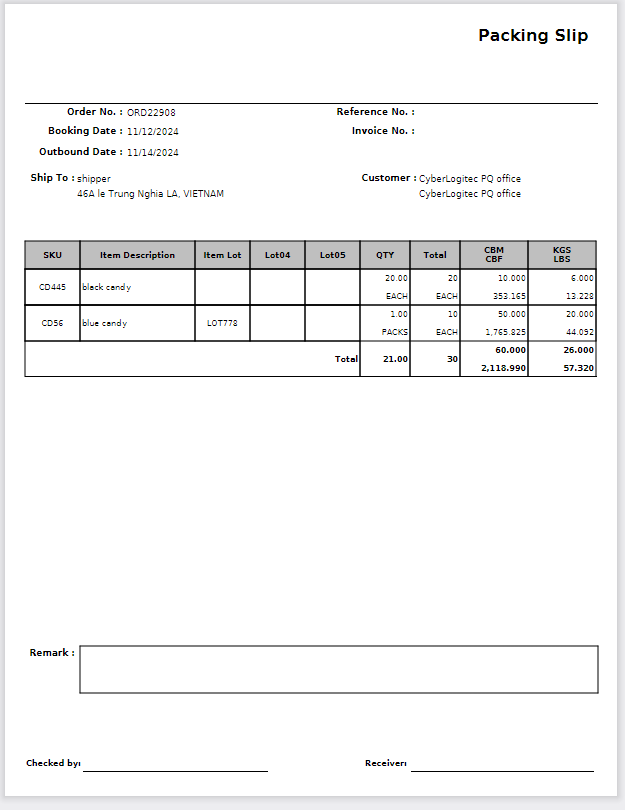
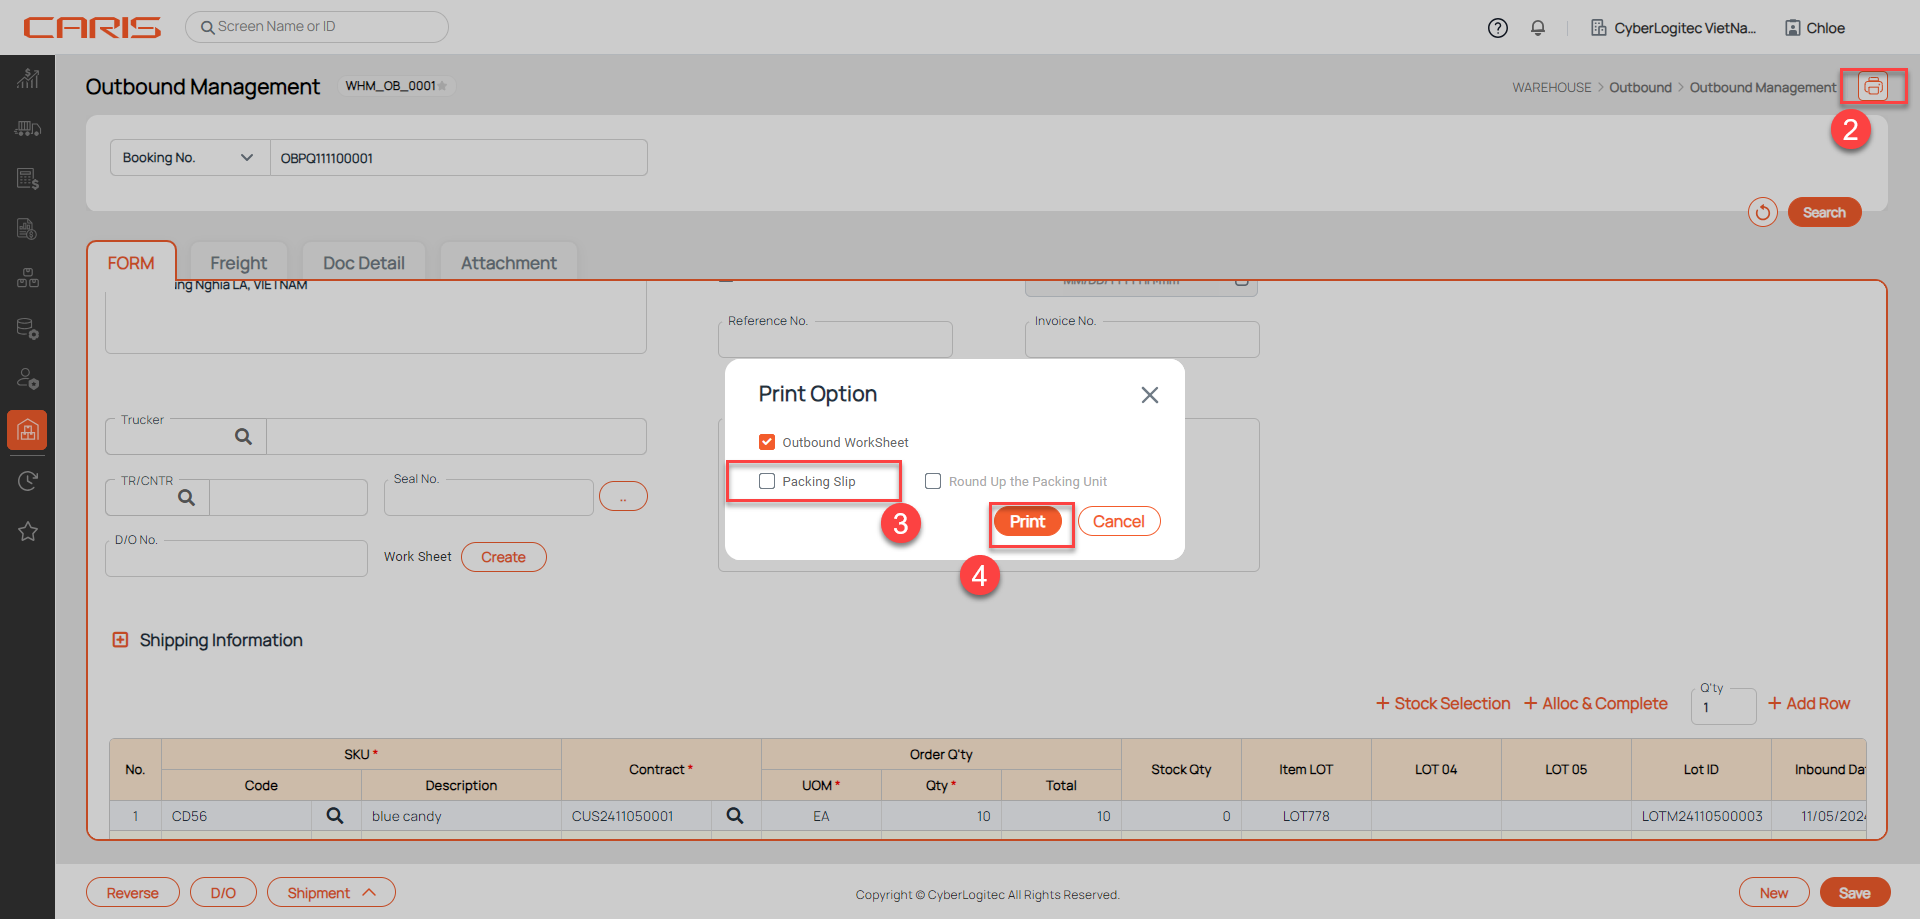
¶ 2. Packing Slip
The Packing Slip Report is a document generated within a Warehouse Management System (WMS) that provides a detailed summary of items included in a shipment. This report is often enclosed with outbound shipments or sent to customers for reference.
Step to print report:
- Open the outbound booking that has status shipped
- Click the print icon
- Select print option is Packing Slip
- Click Print button
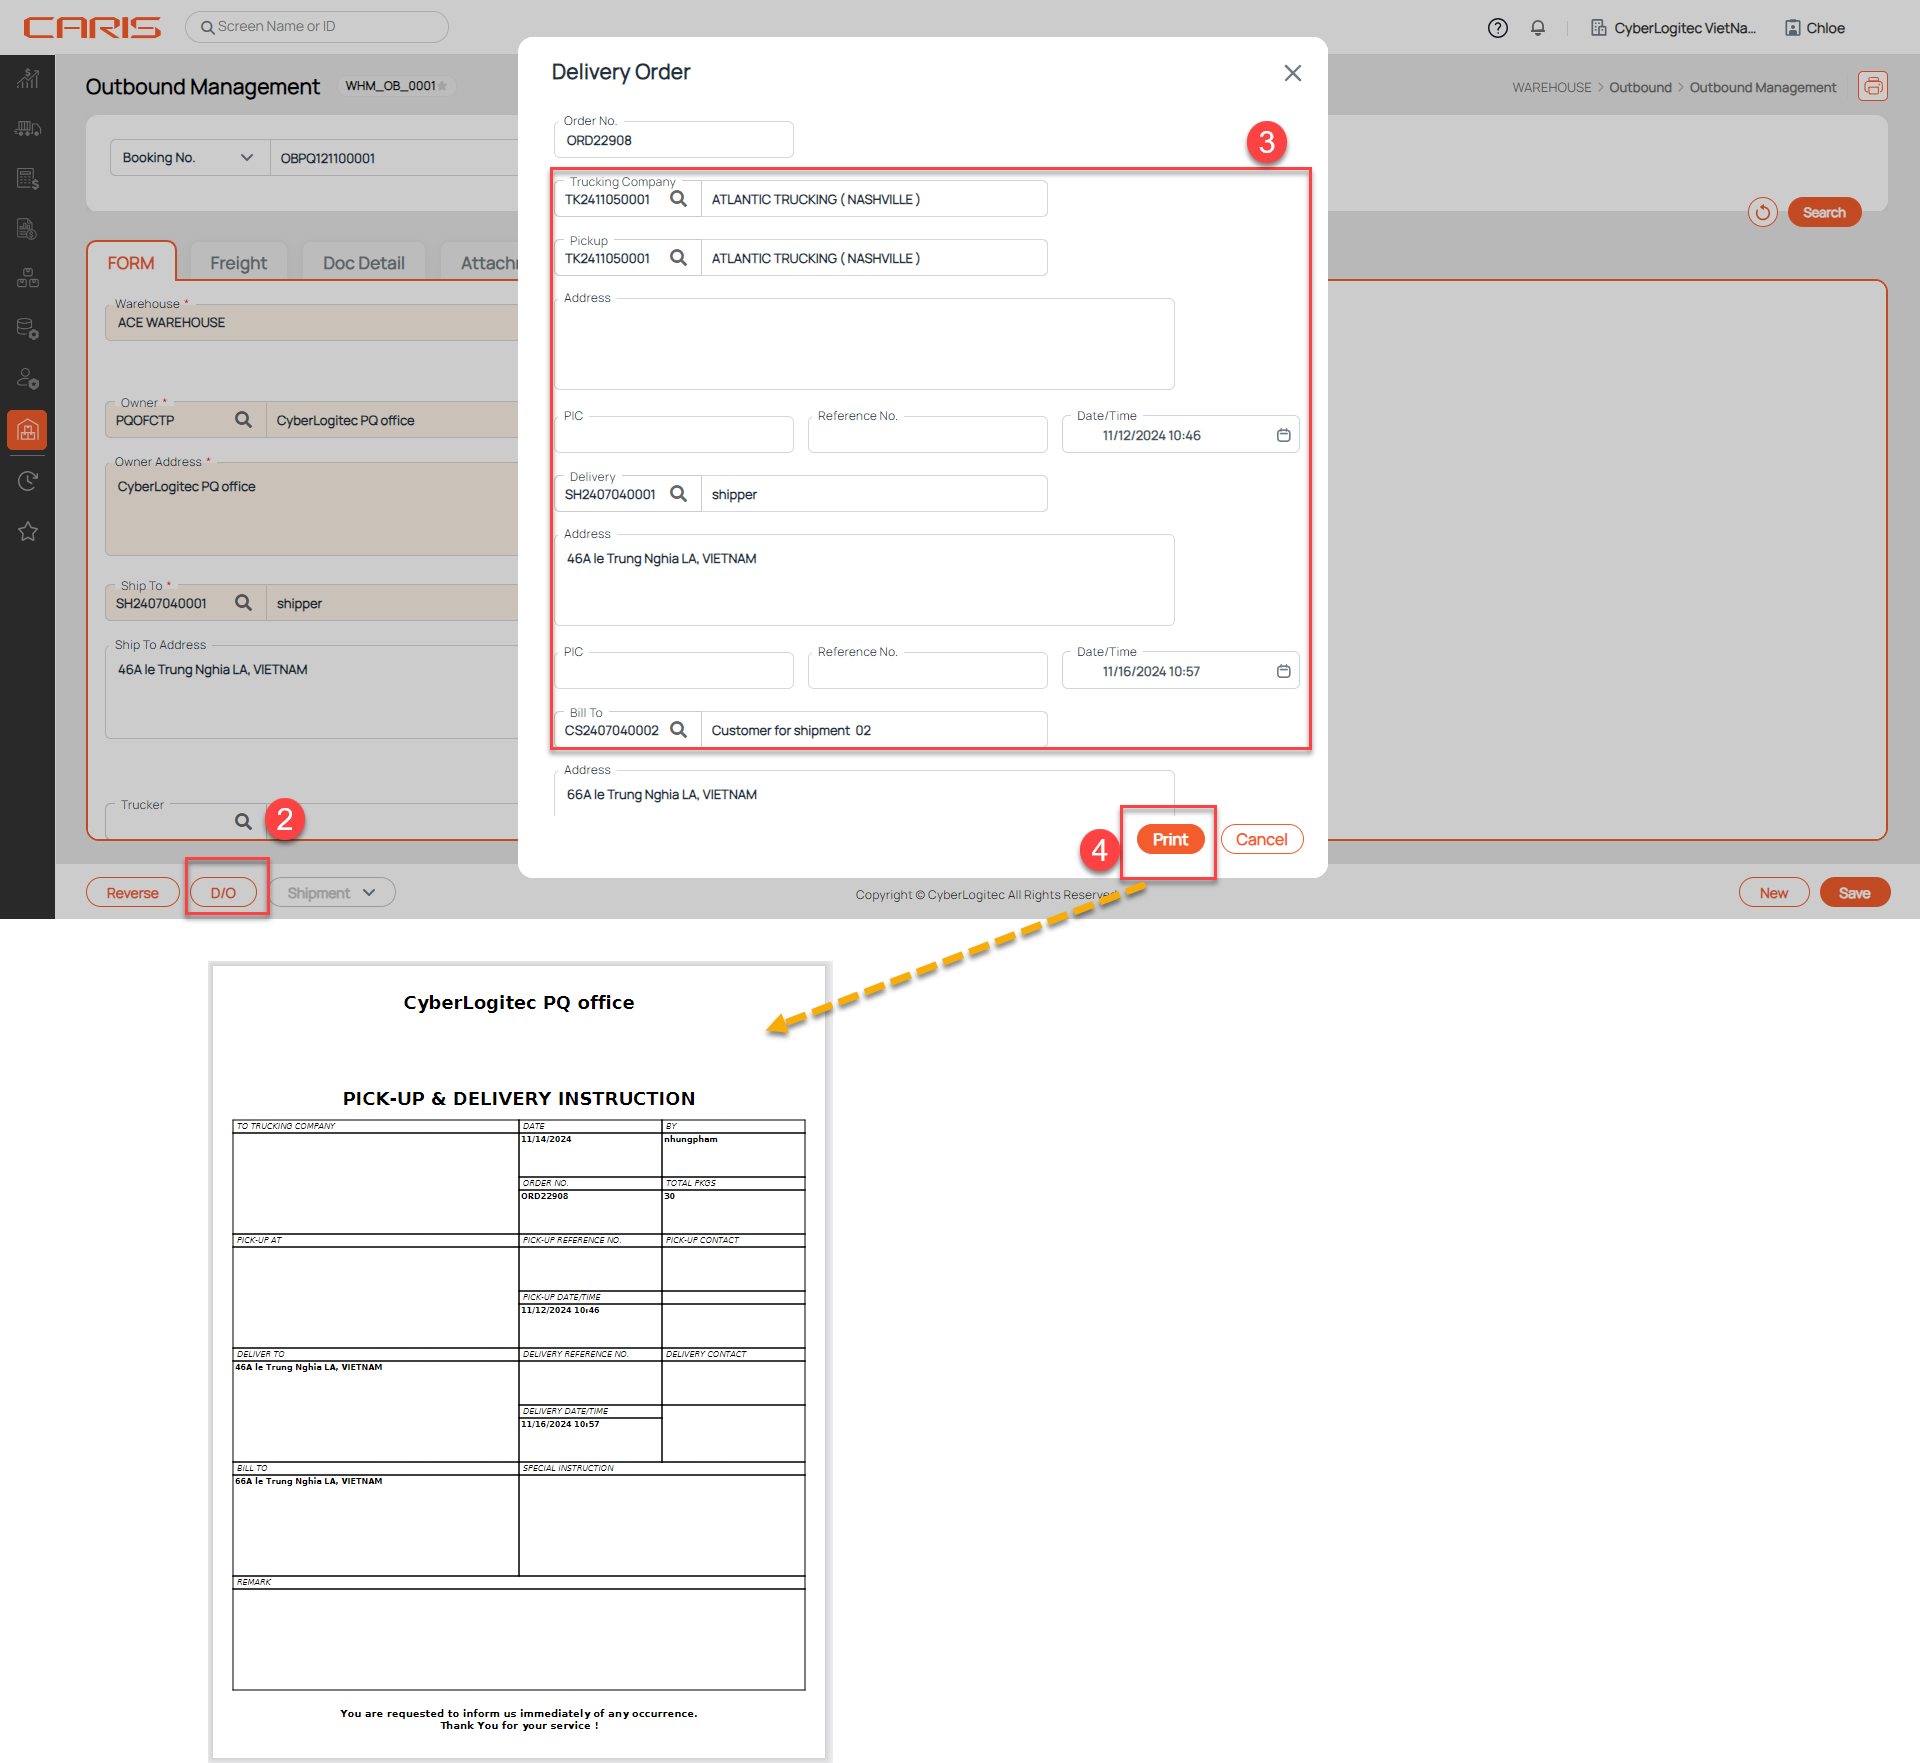
¶ 3. Delivery Order
The Delivery Order Report is a document within a Warehouse Management System (WMS) that provides a comprehensive summary of the details and status of a delivery order (DO).

Step to print report:
- Open the outbound booking
- Click D/O button
- Enter delivery order information
- Click Print button